You can apply the Policy Object by using the Enforce Policy page in the New Provisioning Policy Object Wizard, or you can complete the wizard and then use the Enforce Policy command on the domain, OU, or Managed Unit where you want to apply the policy.For more information on how to apply a Policy Object, see Applying Policy Objects and Managing policy scope.
Introduction
About Active Roles
Getting started
Active Roles main features
Technical overview
Presentation components
Examples of use
Active Roles Console (MMC Interface)
Web Interface
Custom interfaces
Active Roles ADSI Provider
Reporting
Service components
Network data sources
Security and administration elements
Access Templates for role-based administration
Policy Objects to enforce corporate rules
Managed Units to provide administrative views
Active Directory security management
Customization using ADSI Provider and script policies
Dynamic groups
Workflows
Operation in multi-forest environments
Starting the Active Roles Console
User interface overview
View mode
Using Managed Units
Setting up filter
Finding objects
Rule-based administrative views
Steps for searching for a user, contact, or group
Steps for searching for a computer
Steps for searching for an Organizational Unit
Steps for using advanced search options
Steps for building a custom search
LDAP syntax
Displaying members of a Managed Unit
Advanced pane
Customizable Web Interface
View mode
Using Managed Units
Setting up filter
Getting policy-related information
Performing Batch operations
Active Roles service account minimum permissions
About Managed Units
Administering Managed Units
Role-based administration
Creating a Managed Unit
Scenario: Implementing role-based administration across multiple OUs
Steps for creating a Managed Unit
Steps for modifying Managed Unit properties
Steps for modifying permission settings on a Managed Unit
Steps for modifying policy settings on a Managed Unit
Displaying members of a Managed Unit
Adding or removing members from a Managed Unit
Steps for adding membership rules to a Managed Unit
Steps for removing membership rules from a Managed Unit
Steps for including a member to a Managed Unit
Steps for excluding a member from a Managed Unit
Steps for adding group members to a Managed Unit
Steps for removing group members from a Managed Unit
Copying a Managed Unit
Exporting and importing a Managed Unit
Renaming a Managed Unit
Deleting a Managed Unit
Step 1: Creating the Managed Unit
Step 2: Adding users to the Managed Unit
Step 3: Preparing the Access Template
Step 4: Applying the Access Template
Deployment considerations
Working with federated authentication
Access Templates as administrative roles
Access Template management tasks
Rule-based autoprovisioning and deprovisioning
Using predefined Access Templates
Creating an Access Template
Examples of use
Add Permission Entries wizard
Full Control access
Object access
Object property access
Creating or deleting child object permissions
Steps for creating an Access Template
Applying Access Templates
Applying an Access Template directly
Applying Access Templates on a securable object
Applying Access Templates on a user or group
Managing Access Template links
Synchronizing permissions to Active Directory
Steps for synchronizing permissions to Active Directory
Managing Active Directory permission entries
Adding, modifying, or removing permissions
Steps for adding permissions to an Access Template
Steps for modifying permissions in an Access Template
Steps for removing permissions from an Access Template
Nesting Access Templates
Copying an Access Template
Exporting and importing Access Templates
Renaming an Access Template
Deleting an Access Template
Scenario 1: Implementing a helpdesk
Deployment considerations
Step 1: Preparing a helpdesk Access Template
Step 2: Creating a helpdesk group
Step 3: Applying the Help Desk Access Template
Scenario 2: Implementing Self-Administration
Delegating Organizational Unit administration duties
Delegation of group administration
Delegation in a functional vs. hosted environment
Windows claims-based access rules
Understanding access rules
Managing Windows claims
Enabling claim support
Claim Type management overview
Managing and applying Access Rules
Deploying an Access Rule
Source attribute setting
Claim type identifier setting
Display name setting
Description setting
User or computer claim issuance setting
Protection from accidental deletion
Suggested values setting
Steps for managing Claim Types
Populating claim source attributes
Provisioning Policy Objects
Deprovisioning Policy Objects
How Policy Objects work
Policy Object management tasks
Using rule-based and role-based tools for granular administration
Creating a Policy Object
Adding, modifying, or removing policies
Policy configuration tasks
Steps for adding policies to Policy Objects
Steps for modifying policies in a Policy Object
Steps for removing policies from Policy Object
Applying Policy Objects
Adding Managed Units or containers to policy scope
Adding Policy Objects to policy list for directory object
Steps for applying a Policy Object
Managing policy scope
Copying a Policy Object
Renaming a Policy Object
Exporting and importing Policy Objects
Deleting a Policy Object
Property Generation and Validation
Deployment considerations
Checking for policy compliance
Deprovisioning users or groups
How this policy works
How to configure a Property Generation and Validation policy
User Logon Name Generation
Entry type: Text
Entry type: <Object> Property
Entry type: Parent OU Property
Entry type: Parent Domain Property
Entry type: Mask
Configuring a Property Generation and Validation policy
Steps for configuring entries
Scenario 1: Using mask to control phone number format
Scenario 2: Using regular expressions to control phone number format
How this policy works
How to configure a User Logon Name Generation policy
Steps for configuring a User Logon Name Generation policy
Scenario 1: Using uniqueness number
Scenario 2: Using multiple rules
Group Membership AutoProvisioning
How the Group Membership AutoProvisioning policy works
How to configure a Group Membership AutoProvisioning policy
Configuring a Group Membership AutoProvisioning policy
Scenario: Adding users to a specified group
Exchange Mailbox AutoProvisioning
How the Exchange Mailbox AutoProvisioning policy works
How to configure an Exchange Mailbox AutoProvisioning policy
Configuring an Exchange Mailbox AutoProvisioning policy
Scenario: Mailbox store load balancing
AutoProvisioning in SaaS products
Creating and configuring the Exchange Mailbox AutoProvisioning Policy Object
Step 2: Applying the Policy Object
Default creation options for Exchange mailboxes
How the AutoProvisioning in SaaS products policy works
Create Provisioning policy for Starling Connect
OneDrive Provisioning
Home Folder AutoProvisioning
How this policy works
Script Execution
Creating home folders and shares when creating user accounts
Renaming home folders when renaming user accounts
Option to prevent operation on file server
How to configure a Home Folder AutoProvisioning policy
Connect <Drive Letter> to <Network Path>
Enforce this home folder setting in Active Directory
Apply this home folder setting when user account is created
Apply this home folder setting when user account is renamed
Create or rename home folder on file server as needed
Copy user permissions on home folder from parent folder
Set user as home folder owner
Set user permissions on home folder
Steps for configuring a Home Folder AutoProvisioning policy
Using the built-in policy for home folder provisioning
Configuring the Home Folder Location Restriction policy
Scenario: Creating and assigning home folders
How this policy works
How to configure Script Execution policy
Steps for configuring a Script Execution policy
Scenario: Restricting group scope
Microsoft 365 and Azure Tenant Selection
E-mail Alias Generation
How the E-Mail Alias Generation policy works
Configuring an E-mail Alias Generation policy
Configuring an E-mail Alias Generation policy
Scenario: Generating e-mail alias based on user names
User Account Deprovisioning
How this policy works
How to configure a User Account Deprovisioning policy
Office 365 Licenses Retention
Configuring a property update rule
Entry type: Date and Time
Entry type: Initiator ID
Configuring a custom rule to build the Initiator ID
Steps for configuring a User Account Deprovisioning policy
Scenario 1: Disabling and renaming the user account upon deprovisioning
Scenario 2: Managed Unit for deprovisioned user accounts
How this policy works
How to configure Office 365 License Retention policy
Steps for configuring an Office 365 License Retention policy
Report on deprovisioning results
Group Membership Removal
How the Group Membership Removal policy works
How to configure a Group Membership Removal policy
Configuring a Group Membership Removal policy
Scenario: Removing deprovisioned users from all groups
Exchange Mailbox Deprovisioning
How the Exchange Mailbox Deprovisioning policy works
How to configure an Exchange Mailbox Deprovisioning policy
Configuring an Exchange Mailbox Deprovisioning policy
Scenario: Hide mailbox and forward email to manager
Home Folder Deprovisioning
How this policy works
How to configure a Home Folder Deprovisioning policy
Steps for configuring a Home Folder Deprovisioning policy
Scenario: Removing access to home folder
User Account Relocation
How this policy works
How to configure a User Account Relocation policy
Steps for configuring a User Account Relocation policy
Scenario: Organizational Unit for deprovisioned user accounts
User Account Permanent Deletion
How this policy works
How to configure a User Account Permanent Deletion policy
Steps for configuring a User Account Permanent Deletion policy
Scenario: Deleting deprovisioned user accounts
Group Object Deprovisioning
How the Group Object Deprovisioning policy works
How to configure a Group Object Deprovisioning policy
Configuring a Group Object Deprovisioning policy
Scenario 1: Disabling and renaming the group upon deprovisioning
Scenario 2: Managed Unit for deprovisioned groups
Group Object Relocation
How the Group Object Relocation policy works
How to configure a Group Object Relocation policy
Configuring a Group Object Relocation policy
Scenario: Organizational Unit for deprovisioned groups
Group Object Permanent Deletion
How the Group Object Permanent Deletion policy works
How to configure a Group Object Permanent Deletion policy
Configuring a Group Object Permanent Deletion policy
Scenario: Deleting deprovisioned groups
Notification Distribution
How this policy works
How to configure a Notification Distribution policy
Configuring email settings
Steps for configuring a Notification Distribution policy
Scenario: Sending deprovisioning notification
Report Distribution
Default deprovisioning options
Delegating the Deprovision task
Using the Deprovision command
Report on deprovisioning results
Restoring deprovisioned users or groups
Report contents
Report section: User Account Deprovisioning
Report section: Group Membership Removal
Report section: Exchange Mailbox Deprovisioning
Report section: Home Folder Deprovisioning
Report section: User Account Relocation
Report section: User Account Permanent Deletion
Report section: Group Object Deprovisioning
Report section: Group Object Relocation
Report section: Group Object Permanent Deletion
Report section: Notification Distribution
Report section: Report Distribution
Policy options to undo user deprovisioning
Delegating the task to undo deprovisioning
Using the Undo Deprovisioning command
Report on results of undo deprovisioning
Container Deletion Prevention policy
Picture management rules
Policy extensions
Report contents
Report section: Undo User Account Deprovisioning
Report section: Undo Group Membership Removal
Report section: Undo Exchange Mailbox Deprovisioning
Report section: Undo Home Folder Deprovisioning
Report section: Undo User Account Relocation
Report section: Undo User Account Permanent Deletion
Report section: Undo Group Object Deprovisioning
Report section: Undo Group Object Relocation
Report section: Undo Group Object Permanent Deletion
Example: Configuring high granularity by hiding a specific Azure group
Workflows
Configuring a Managed Unit to hide specific Microsoft 365 groups
Configuring an Access Template to hide Microsoft 365 Groups
Enabling or disabling the granular access to Microsoft 365 Groups
Example: Configuring high granularity by hiding specific Azure users
Configuring a Managed Unit to hide specific Azure users
Configuring an Access Template to hide Azure users
Enabling or disabling the granular access to Azure users
Example: Configuring high granularity by showing only specific Azure users
Key workflow features and definitions
Temporal Group Memberships
Group Family
Workflow
Workflow definition
Workflow start conditions
Workflow instance
Workflow activity
Workflow Designer
Workflow engine
Email notifications
About workflow processes
Workflow processing overview
Workflow activities overview
Approval activity
Notification activity
Configuring a workflow
Workflow notification recipients
Workflow notification message
Web Interface address
Email server for workflow notifications
Script activity
If-Else activity
Stop/Break activity
Add Report Section activity
Search activity
Search scenario
Object type
Search scope
Search options
Search for inactive accounts
Search filter
Notification
Error handling – Search activity
"Run as" options
Additional settings – Search activity
Stop Search activity
CRUD activities
Create activity
Update activity
Add to group activity
Remove from group activity
Move activity
Deprovision activity
Undo deprovision activity
Delete activity
Activity target
Notification
Error handling – CRUD activities
"Run as" options
Additional settings – CRUD activities
Save Object Properties activity
Modify Requested Changes activity
Creating a workflow definition for a workflow
Configuring workflow start conditions
Configuring workflow parameters
Adding activities to a workflow
Configure an Approval activity
Approval workflow
Configure approvers
Configure escalation
Configure request for additional information
Configure request for review
Customize the header of the approval task page
Customize approval action buttons
Configuring a Notification activity
Configuring a Script activity
Configuring an If-Else activity
Configuring a Stop/Break activity
Configuring an Add Report Section activity
Configuring a Search activity
Configuring Scope and filter settings
Configuring a notification for a Search activity
Configuring error handling for a Search activity
Configuring “Run as” options for a Search activity
Configuring additional settings for a Search activity
Configuring CRUD activities
Configuring a Create activity
Configuring an Update activity
Configuring an “Add to group” activity
Configuring a Remove from group activity
Configuring a Move activity
Configuring a Deprovision activity
Configuring an Undo deprovision activity
Configuring a Delete activity
Configuring a notification for a CRUD activity
Configuring error handling for a CRUD activity
Configuring “Run as” options for a CRUD activity
Configuring additional settings for a CRUD activity
Configuring a Save Object Properties activity
Configuring a Modify Requested Changes activity
Enabling or disabling an activity
Enabling or disabling a workflow
Using the initialization script
Definition of terms – Approval workflow
How the Approval workflow works
Creating and configuring an approval workflow
Email-based approval
Integration with Microsoft Outlook
Integration with non-Outlook email clients
Email transport via Exchange Web Services
Automation workflow
Automation workflow options and start conditions
Activity extensions
Run the workflow on a schedule
Allow the workflow to be run on demand
“Run as” options for an automation workflow
Additional settings for an automation workflow
Parameters for an automation workflow
Initialization script for an automation workflow
Using automation workflows
Creating an automation workflow definition
Configuring start conditions for an automation workflow
Adding activities to an automation workflow
Running an automation workflow on demand
Viewing the run history of an automation workflow
Stopping a running automation workflow
Disabling an automation workflow from running
Re-enabling an automation workflow to run
Delegating automation workflow tasks
Sample Azure Hybrid Migration
Microsoft 365 automation workflow
Design overview of Group Family
How Group Family works
Group Family policy options
Creating a Group Family
Dynamic groups
Start the New Group Family Wizard
Name the Group Family
Grouping options
Location of managed objects
Selection of managed objects
Group-by properties
Capture existing groups manually
Group naming rule
Group type and scope
Location of groups
Exchange-related settings
Group Family scheduling
Steps for creating a Group Family
Administering Group Family
Controlled groups
General tab
Controlled groups tab
Groupings tab
Schedule tab
Action Summary tab
Steps for administering a Group Family
Departmental Group Family
Cross-domain membership
Dynamic groups policy options
Converting a basic group to a dynamic group
Displaying the members of a dynamic group
Adding a membership rule to a dynamic group
Removing a membership rule from a dynamic group
Converting a dynamic group to a basic group
Modifying, renaming, or deleting a dynamic group
Automatically moving users between groups
Active Roles Reporting
Collector to prepare data for reports
Management History
Starting the Active Roles Collector wizard
Collecting data from the network
Processing gathered events
Importing events from an earlier database version
Deploying reports to the Report Server
Working with reports
Configuring the data source
Generating and viewing a report
Contents of the Active Roles Report Pack
Active Directory Assessment/Domains
Active Directory Assessment/Users/Account Information
Active Directory Assessment/Users/Exchange
Active Directory Assessment/Users/Obsolete Accounts
Active Directory Assessment/Users/Miscellaneous Information
Active Directory Assessment/Groups
Active Directory Assessment/Group Membership
Active Directory Assessment/Organizational Units
Active Directory Assessment/Other Directory Objects
Active Directory Assessment/Potential Issues
Active Roles Tracking Log/Active Directory Management
Active Roles Tracking Log/Dashboard
Active Roles Tracking Log/Active Roles Events
Active Roles Tracking Log/Active Roles Configuration Changes
Active Roles Tracking Log/Active Roles Workflow
Administrative Roles
Managed Units
Policy Objects
Policy Compliance
Management History considerations and best practices
Management History configuration
Entitlement profile
Change-tracking policy
Change Tracking log configuration
Replication of Management History data
Viewing change history
Replication is not yet configured
Replication is already configured
Re-configuring replication of Management History data
Centralized Management History storage
Workflow activity report sections
Examining user activity
“Approval” activity report section
“Script” activity report section
“Stop/Break” activity report section
“Add Report Section” activity report section
“Create” activity report section
“Update” activity report section
“Add to group” activity report section
“Remove from group” activity report section
“Move” activity report section
“Deprovision” activity report section
“Undo deprovision” activity report section
“Delete” activity report section
Policy report items
Active Roles internal policy report items
About entitlement profile specifiers
Entitlement profile configuration
Recycle Bin
Creating entitlement profile specifiers
Changing entitlement profile specifiers
Predefined specifiers
Viewing entitlement profile
Finding and listing deleted objects
Restoring a deleted object
Delegating operations on deleted objects
Applying policy or workflow rules
AD LDS data management
Managing AD LDS objects
One Identity Starling Join and configuration through Active Roles
Adding an AD LDS user to the directory
Adding an AD LDS group to the directory
Adding or removing members from an AD LDS group
Disabling or enabling an AD LDS user account
Setting or modifying the password of an AD LDS user
Adding an Organizational Unit to the directory
Adding an AD LDS proxy object (user proxy)
Configuring Active Roles for AD LDS
Prerequisites to configure One Identity Starling
Configuring Active Roles to join One Identity Starling
Disconnecting One Identity Starling from Active Roles
Managing One Identity Starling Connect
Viewing Starling Connect settings in Active Roles Configuration Center
Create Provisioning policy for Starling Connect
Provision a new SaaS user using the Web Interface
Provision an existing Active Roles user for SaaS products
Update the SaaS product user properties
Delete the SaaS product user
Deprovision an existing Active Roles user for SaaS products
Notifications for Starling operations
SCIM attribute mapping with Active Directory
Configuring linked mailboxes with Exchange Resource Forest Management
Prerequisites of configuring linked mailboxes
Configuring remote mailboxes for on-premises users
Registering the resource and account forests in Active Roles
Applying the ERFM Mailbox Management policy to an OU
Configuring the ERFM Mailbox Management scheduled task
Changing the location of the shadow accounts
Configuring the synchronized, back synchronized or substituted properties of linked mailboxes
Creating a linked mailbox for a new user
Creating a linked mailbox for an existing user with no mailbox
Modifying the Exchange properties of a linked mailbox
Configuring a user with a linked mailbox for managing mail-enabled groups
Converting a user mailbox to a linked mailbox
Converting a linked mailbox to a user mailbox
Deprovisioning a user with a linked mailbox
Undo deprovisioning for a user with a linked mailbox (re-provisioning)
Deleting a user with a linked mailbox
Assigning a remote mailbox to an on-premises user
Verifying that a remote mailbox is assigned to an on-premises user
Viewing or modifying the Exchange Online properties of a remote mailbox
Azure AD, Microsoft 365, and Exchange Online Management
Configuring the mail flow settings of an Exchange Online mailbox
Configuring the delegation settings of an Exchange Online mailbox
Configuring the general email address settings of an Exchange Online mailbox
Configuring the mailbox features of an Exchange Online mailbox
Configuring the mailbox settings of an Exchange Online mailbox
Deleting or changing the remote mailbox of an on-premises user
Configuring Active Roles to manage Hybrid AD objects
Modern Authentication
Managing the configuration of Active Roles
Configuring Active Roles to manage Azure AD using the GUI
Managing Hybrid AD users
Configuring a new Azure tenant and consenting Active Roles as an Azure application
Importing an Azure tenant and consenting Active Roles as an Azure application
Performing Azure Tenant association
Viewing or modifying the Azure tenant type
Enabling OneDrive in an Azure tenant
Removing an Azure tenant
Viewing the Azure Health status for Azure tenants and applications
Viewing the Azure Licenses Report of an Azure tenant
Viewing the Office 365 Roles Report of an Azure tenant
Adding an Azure AD tenant using Management Shell
Add an Azure AD application using Management Shell
Active Roles configuration steps to manage Hybrid AD objects
Active Roles configuration to synchronize existing Azure AD objects to Active Roles
Configuring Sync Workflow to back synchronize Azure AD objects to Active Roles automatically using the Active Roles Synchronization Service Console
Configuring Sync Workflow to back synchronize Azure AD objects to Active Roles manually
Changes to Azure M365 Policies in Active Roles after 7.4.1
Creating a new Azure AD user with the Web Interface
Viewing or updating the Azure AD user properties with the Web Interface
Viewing or modifying the manager of a hybrid Azure user
Disabling an Azure AD user
Enabling an Azure AD user
Deprovisioning of an Azure AD user
Undo deprovisioning of an Azure AD user
Adding an Azure AD user to a group
Removing an Azure AD user from a group
View the change history and user activity for an Azure AD user
Deleting an Azure AD user with the Web Interface
Creating a new hybrid Azure user with the Active Roles Web Interface
Converting an on-premises user with an Exchange mailbox to a hybrid Azure user
Licensing a hybrid Azure user for an Exchange Online mailbox
Viewing or modifying the Exchange Online properties of a hybrid Azure user
Unified provisioning policy for Azure M365 Tenant Selection, Microsoft 365 License Selection, Microsoft 365 Roles Selection, and OneDrive provisioning
Configuring the mail flow settings of an Exchange Online mailbox
Configuring the delegation settings of an Exchange Online mailbox
Configuring the general email address settings of an Exchange Online mailbox
Configuring the mailbox features of an Exchange Online mailbox
Configuring the mailbox settings of an Exchange Online mailbox
Creating a new Azure AD user with Management Shell
Updating the Azure AD user properties with the Management Shell
Viewing the Azure AD user properties with the Management Shell
Delete an Azure AD user with the Management Shell
Assigning Microsoft 365 licenses to new hybrid users
Assigning Microsoft 365 licenses to existing hybrid users
Modifying or removing Microsoft 365 licenses assigned to hybrid users
Updating Microsoft 365 licenses display names
How the M365 and Azure Tenant Selection policy works
Configuring an M365 and Azure Tenant Selection policy
Applying a new M365 and Azure Tenant Selection policy
Microsoft 365 roles management for hybrid environment users
Assigning Microsoft 365 roles to existing hybrid users
Modifying Microsoft 365 roles assigned to hybrid users
Managing Microsoft 365 contacts
Create a new Microsoft 365 contact
View or modify the Microsoft 365 contact properties
View the change history of an Microsoft 365 contact
Delete an Microsoft 365 contact
Managing Hybrid AD groups
Creating an Azure AD group with the Web Interface
Viewing or modifying Azure AD group properties with the Web Interface
Adding or removing members from an Azure AD group with Web Interface
Viewing the change history for an Azure AD group with the Web Interface
Deleting an Azure AD group with the Web Interface
Creating a new Azure AD group with the Management Shell
Updating the Azure AD group properties with the Management Shell
Adding or removing members from an Azure AD group with the Management Shell
Deleting an Azure AD group with the Management Shell
Managing Microsoft 365 Groups
Configuring M365 Groups with the Web Interface
Managing cloud-only distribution groups
Creating an M365 Group with the Web Interface
Modifying an M365 Group with the Web Interface
Adding or removing owners from an M365 Group with the Web Interface
Adding or removing members from an M365 Group with the Web Interface
Viewing the members of a dynamic M365 Group with the Web Interface
Viewing the change history of an M365 Group in the Web Interface
Deleting an M365 Group with the Web Interface
Microsoft 365 Group management tasks using Management Shell interface
Create a new Microsoft 365 Group
Update the Microsoft 365 Group properties
Delete an Microsoft 365 group
Adding members to an Microsoft 365 Group with the Management Shell
Get a member from Microsoft 365 Group
Get group from Microsoft 365 Group
Removing members from an Microsoft 365 Group with the Management Shell
Scheduling an Azure object synchronization task
Creating a new distribution group
Viewing or modifying the properties of a distribution group
Viewing or modifying the members of a distribution group
Renaming a distribution group
Viewing or modifying the message approval settings of a distribution group
Viewing or modifying the delivery management of a distribution group
Viewing or modifying delegates of a distribution group
Viewing the change history of a distribution group
Deleting a distribution group
Managing cloud-only dynamic distribution groups
Creating a new dynamic distribution group
Viewing or modifying the properties of a dynamic distribution group
Viewing or modifying the members of a dynamic distribution group
Viewing or modifying the message approval settings of a dynamic distribution group
Viewing or modifying the delivery management of a dynamic distribution group
Viewing or modifying delegates of a dynamic distribution group
Viewing or modifying the Azure membership of a dynamic distribution group
Viewing the change history of a dynamic distribution group
Deleting a dynamic distribution group
Managing Azure security groups
Creating an Azure security group with the Web Interface
Modifying an Azure security group with the Web Interface
Adding or removing owners from an Azure security group with the Web Interface
Adding or removing members from an Azure security group with the Web Interface
Viewing the members of a dynamic Azure security group with the Web Interface
Viewing the change history of an Azure security group in the Web Interface
Deleting an Azure security group with the Web Interface
Managing cloud-only Azure users
Viewing cloud-only Azure user
Creating a new cloud-only Azure user
Viewing or modifying the properties of a cloud-only Azure user
Configuring Microsoft OneDrive for cloud-only Azure users
Disabling a cloud-only Azure user
Enabling a cloud-only Azure user
Viewing and modifying Exchange Online properties
Resetting password for a cloud-only Azure user
Renaming a cloud-only Azure user
Viewing Azure membership
Viewing Change History and User Activity
Deleting an Azure user account
Managing cloud-only Azure guest users
Inviting an Azure guest user
Viewing Azure guest users
Disabling or Enabling an Azure guest user
Revoking the session of an Azure guest user
Resending the invitation to an Azure guest user
Renaming an Azure guest user
Viewing and updating the properties of an Azure guest user
Managing cloud-only Azure contacts
Configuring the Identity settings of an Azure guest user
Configuring the Settings of an Azure guest user
Configuring the Job Info settings of an Azure guest user
Configuring the Contact Info settings of an Azure guest user
Configuring the Licenses settings of an Azure guest user
Configuring the O365 Admin Roles settings of an Azure guest user
Viewing or updating the Exchange Online properties of an Azure guest user
Configuring the mail flow settings of an Exchange Online mailbox
Configuring the delegation settings of an Exchange Online mailbox
Configuring the general email address settings of an Exchange Online mailbox
Configuring the mailbox features of an Exchange Online mailbox
Configuring the mailbox settings of an Exchange Online mailbox
Resetting the password of an Azure guest user
Deleting an Azure guest user
Configuring the O365 Group membership of an Azure guest user
Viewing the change history of an Azure guest user
View cloud-only Azure contacts
Create new cloud-only Azure contacts
View or modify Azure contacts properties
Renaming Azure cloud contacts
Viewing and modifying Exchange Online properties
Viewing the change history of cloud-only Azure contacts
Deleting an Azure contact
Changes to Active Roles policies for cloud-only Azure objects
Managing room mailboxes
Managing cloud-only shared mailboxes
Creating a new shared mailbox
Viewing or modifying the general properties of a shared mailbox
Viewing or modifying the contact settings of a shared mailbox
Viewing or modifying the organization settings of a shared mailbox
Viewing or modifying the email settings of a shared mailbox
Viewing or modifying the auto-reply settings of a shared mailbox
Viewing or modifying the protocol settings of a shared mailbox
Viewing or modifying the advanced email settings of a shared mailbox
Viewing or modifying the policy settings of a shared mailbox
Configuring the distribution group membership of a shared mailbox
Viewing the change history of a shared mailbox
Deleting a shared mailbox
Connecting to the Administration Service
Managed domains
Using unmanaged domains
Evaluating product usage
SQL Server replication
Viewing product usage statistics
Scheduled task to count managed objects
Managed scope to control product usage
Voluntary thresholds for the managed object count
Installation label
Creating and using virtual attributes
Examining client sessions
Monitoring performance
Customizing the Console
Other Properties tab in the Properties dialog
Other Properties page in object creation wizard
Customizing object display names
Using Configuration Center
Configuration Center design elements
Configuring a local or remote Active Roles instance
Running Configuration Center
Tasks you can perform in Configuration Center
Changing the Active Roles Admin account
Enabling or disabling diagnostic logs
Active Roles Log Viewer
Initial configuration tasks
Administration Service management tasks
Viewing the core Administration Service settings
Changing the core Administration Service settings
Importing configuration data
Importing Management History data
Viewing the state of the Administration Service
Starting, stopping or restarting the Administration Service
Web Interface management tasks
Identify Web Interface sites
Create a Web Interface site
Modify a Web Interface site
Delete a Web Interface site
Export a Web Interface site’s configuration object to a file
Configure Web Interface for secure communication
Disabling secure communication for Web Interface sites
Configuring federated authentication
Starling Join configuration task
Active Roles Console access management
Logging management tasks
Solution Intelligence
Configuring gMSA as an Active Roles Service account
SQL Server replication terminology
SQL Server replication model overview
SQL Server-related permissions
Configuring SQL Server
Configuring replication
About replication groups
Using regular expressions
Administrative Template
Creating a replication group
Adding members to a replication group
Removing members from a replication group
Monitoring replication
Always On Availability Groups
Using database mirroring
Viewing replication settings
Identifying replication-related problems
Viewing database connection settings
Modifying database connection settings
Changing the service account
Changing the SQL Server Agent logon account
Modifying Replication Agent credentials
Moving the Publisher role
Recovering replication if the Publisher is not available
Troubleshooting replication failures
Active Roles snap-in settings
Administration Service auto-connect settings
Communication ports
'Allowed Servers for Auto-connect' setting
'Disallowed Servers for Auto-connect' setting
'Additional Servers for Auto-connect' setting
Loading the Administrative Template
Access to the managed environment
Access to Active Roles Administration Service
Access to Active Roles Web Interface
Active Roles and supported Azure environments
Azure object management supported in various Azure environments
Azure object management in a Non-Federated environment
Azure object management in Federated and Synchronized Identity environments
Integrating Active Roles with other products and services
Active Roles integration with other One Identity and Quest products
Active Roles integration with Duo
Active Roles integration with Okta
Active Roles Language Pack
Supported languages
Localization limitations
Modifying the language of Active Roles components in the Windows registry
Modifying the language of the Web Interface
Active Roles Diagnostic Tools
Using System Checker
Using the Log Viewer tool
Using the Directory Changes Monitor command-line interface
Active Roles Add-on Manager
Step 3: Applying the Policy Object
Rule-based autoprovisioning and deprovisioning > Policy configuration tasks > Group Object Deprovisioning > Step 3: Applying the Policy Object
Microsoft 365 and Azure Tenant Selection
Rule-based autoprovisioning and deprovisioning > Policy configuration tasks > Microsoft 365 and Azure Tenant Selection
Microsoft 365 and Azure Tenant Selection policies help you manage Azure tenant selection, Microsoft 365 (M365) license and role selection, and OneDrive provisioning for hybrid Azure users in the Azure tenant.
How this policy works
Rule-based autoprovisioning and deprovisioning > Policy configuration tasks > Microsoft 365 and Azure Tenant Selection > How this policy works
The provisioning policy O365 and Azure Tenant Selection is a unified policy for Azure Office 365 management for users, controlled or restricted by creating a new provisioning policy and applying the policy to the Organizational Unit. This policy is used for tenant selection, Office 365 license selection, and Office 365 roles selection, and OneDrive provisioning forAzure AD users.
This policy is also used for tenant selection for Groups and contacts.
Configuring an O365 and Azure Tenant Selection policy
Rule-based autoprovisioning and deprovisioning > Policy configuration tasks > Microsoft 365 and Azure Tenant Selection > Configuring an O365 and Azure Tenant Selection policy
You can configure an O365 and Azure Tenant Selection policy in the Active Roles Console (also known as the MMC Interface) to:
- Validate the selected Azure tenants for Azure users, guest users, O365 groups, Azure security groups, and contacts.
- Select O365 Licenses for Azure users and guest users.
- Select O365 Roles for Azure users and guest users.
- Preprovision OneDrive for Azure users.
Prerequisites
Consider the following before configuring an O365 and Azure Tenant Selection policy:
-
The OneDrive settings of this policy are applicable to hybrid Azure users only, and will work only if you have already enabled OneDrive for your Azure tenant in the Azure AD Configuration > Modify (Tenant details) window of the Active Roles Configuration Center. For more information on enabling OneDrive for Azure users in an Azure tenant, see Enabling OneDrive in an Azure tenant.
-
To configure an O365 and Azure Tenant Selection policy, your Organizational Unit (OU) must already have the Azure - Default Rules to Generate Properties built-in policy configured. For more information on configuring the policy, see Configuring the Azure - Default Rules to Generate Properties policy.
To configure an O365 and Azure Tenant Selection policy
-
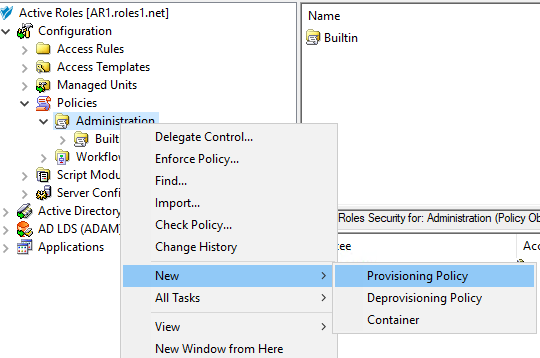
Navigate to Configuration > Policies > Administration.
-
To open the New Provisioning Policy Object Wizard dialog, right-click in the middle pane to open the context menu, and then select New > Provisioning Policy.
-
On the Name and Description page, provide a unique Name for the new Policy Object. Optionally, also provide a Description. To continue, click Next.
-
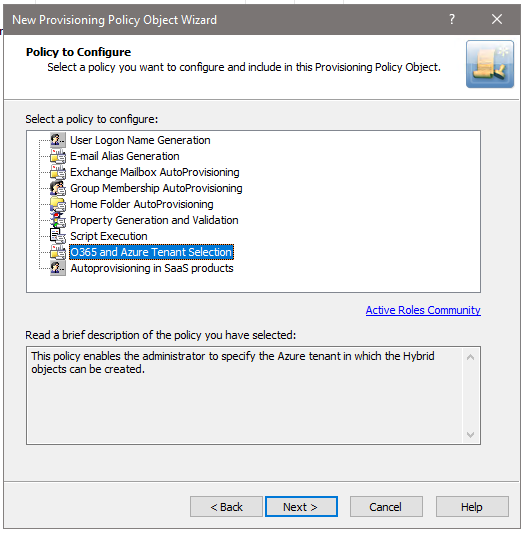
On the Policy to Configure page, select O365 and Azure Tenant Selection, and click Next.
-
On the Object Type Selection page, to specify the type of object you want the policy to provision, click Select, then click OK.
TIP: If you do not see the object type you need, expand the list by selecting Show all possible object types.
NOTE: If you want to assign and validate Office 365 licenses and roles, or provision OneDrive storage as part of the configured policy, select the User (user) object type in this step. Office 365 license and role validation, and OneDrive provisioning are not applicable to Azure Groups and Azure Contacts.
-
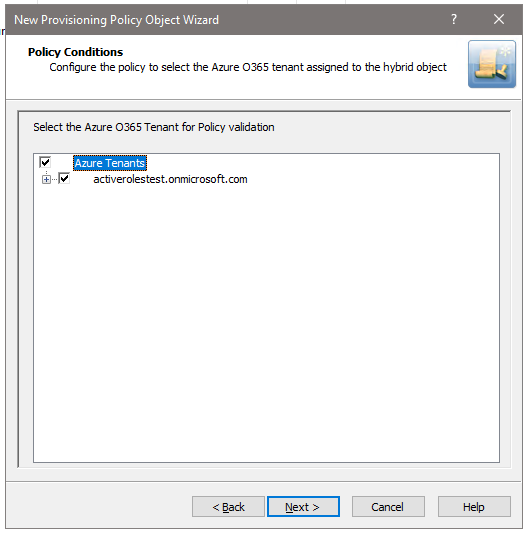
On the Policy Conditions page, select your Azure tenant for which you want to set up the policy. To continue, click Next.
-
(Optional) On the next Policy Conditions page, select the licenses to validate and assign to new Azure users in the Azure tenant. To continue, click Next.
NOTE: If OneDrive storage is planned to be provisioned in the selected Azure tenant for Azure users, make sure that you select the SharePoint Online license in this step. Otherwise, the configured OneDrive storage cannot be provisioned for Azure users created later. For more information, see Creating a new cloud-only Azure user.
-
(Optional) On the next Policy Conditions page, select the Office 365 roles to validate and assign to new Azure users in the Azure tenant. To continue, click Next.
-
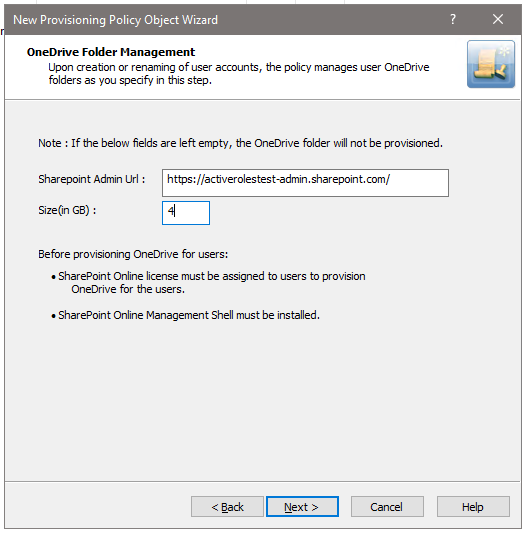
(Optional) To configure OneDrive storage for the Azure users of the Azure tenant, configure the following attributes on the OneDrive Folder Management page:
-
SharePoint Admin URL: Specify the URL of the SharePoint administration site of your Azure tenant. The URL has the following syntax: <azure-tenant-name>-admin.sharepoint.com
-
Size (in GB): Specify the default OneDrive storage size allocated for each Azure user in the Azure tenant.
If you do not need to provision OneDrive storage for users in the Azure tenant, leave the settings empty and click Next.
NOTE: If the wizard shows an error when clicking Next after configuring the OneDrive settings:
-
Check that the specified SharePoint Admin URL is correct.
-
Make sure that the specified OneDrive storage size is correct (that is, it is within the range of the individual cloud storage allowed for users in your organization).
-
-
On the Enforce Policy page, select the Organizational Unit (OU) for which the policy will be applied. To do so, click Add to open the Select Objects window, then select the OU from the list. To continue, click OK then Next.
-
To complete the wizard, click Finish.