Chatta subito con l'assistenza
Chat con il supporto

Active Roles 8.1.1 - Administration Guide

Introduction Getting started Rule-based administrative views Role-based administration
Access Templates as administrative roles Access Template management tasks Examples of use Deployment considerations Windows claims-based access rules
Rule-based autoprovisioning and deprovisioning
Provisioning Policy Objects Deprovisioning Policy Objects How Policy Objects work Policy Object management tasks Policy configuration tasks
Property Generation and Validation User Logon Name Generation Group Membership AutoProvisioning Exchange Mailbox AutoProvisioning AutoProvisioning in SaaS products OneDrive Provisioning Home Folder AutoProvisioning Script Execution Microsoft 365 and Azure Tenant Selection E-mail Alias Generation User Account Deprovisioning Office 365 Licenses Retention Group Membership Removal Exchange Mailbox Deprovisioning Home Folder Deprovisioning User Account Relocation User Account Permanent Deletion Group Object Deprovisioning Group Object Relocation Group Object Permanent Deletion Notification Distribution Report Distribution
Deployment considerations Checking for policy compliance Deprovisioning users or groups Restoring deprovisioned users or groups Container Deletion Prevention policy Picture management rules Policy extensions
Using rule-based and role-based tools for granular administration Workflows
Key workflow features and definitions About workflow processes Workflow processing overview Workflow activities overview Configuring a workflow
Creating a workflow definition for a workflow Configuring workflow start conditions Configuring workflow parameters Adding activities to a workflow Configure an Approval activity Configuring a Notification activity Configuring a Script activity Configuring an If-Else activity Configuring a Stop/Break activity Configuring an Add Report Section activity Configuring a Search activity Configuring CRUD activities Configuring a Save Object Properties activity Configuring a Modify Requested Changes activity Enabling or disabling an activity Enabling or disabling a workflow Using the initialization script
Approval workflow Email-based approval Automation workflow Activity extensions
Temporal Group Memberships Group Family Dynamic groups Active Roles Reporting Management History Entitlement profile Recycle Bin AD LDS data management One Identity Starling Join and configuration through Active Roles Managing One Identity Starling Connect Configuring linked mailboxes with Exchange Resource Forest Management Configuring remote mailboxes for on-premises users Azure AD, Microsoft 365, and Exchange Online Management
Configuring Active Roles to manage Hybrid AD objects Managing Hybrid AD users
Creating a new Azure AD user with the Web Interface Viewing or updating the Azure AD user properties with the Web Interface Viewing or modifying the manager of a hybrid Azure user Disabling an Azure AD user Enabling an Azure AD user Deprovisioning of an Azure AD user Undo deprovisioning of an Azure AD user Adding an Azure AD user to a group Removing an Azure AD user from a group View the change history and user activity for an Azure AD user Deleting an Azure AD user with the Web Interface Creating a new hybrid Azure user with the Active Roles Web Interface Converting an on-premises user with an Exchange mailbox to a hybrid Azure user Licensing a hybrid Azure user for an Exchange Online mailbox Viewing or modifying the Exchange Online properties of a hybrid Azure user Creating a new Azure AD user with Management Shell Updating the Azure AD user properties with the Management Shell Viewing the Azure AD user properties with the Management Shell Delete an Azure AD user with the Management Shell Assigning Microsoft 365 licenses to new hybrid users Assigning Microsoft 365 licenses to existing hybrid users Modifying or removing Microsoft 365 licenses assigned to hybrid users Updating Microsoft 365 licenses display names
Unified provisioning policy for Azure M365 Tenant Selection, Microsoft 365 License Selection, Microsoft 365 Roles Selection, and OneDrive provisioning Microsoft 365 roles management for hybrid environment users Managing Microsoft 365 contacts Managing Hybrid AD groups Managing Microsoft 365 Groups Managing cloud-only distribution groups Managing cloud-only dynamic distribution groups Managing Azure security groups Managing cloud-only Azure users Managing cloud-only Azure guest users Managing cloud-only Azure contacts Changes to Active Roles policies for cloud-only Azure objects Managing room mailboxes Managing cloud-only shared mailboxes
Modern Authentication Managing the configuration of Active Roles
Connecting to the Administration Service Managed domains Using unmanaged domains Evaluating product usage Creating and using virtual attributes Examining client sessions Monitoring performance Customizing the Console Using Configuration Center Changing the Active Roles Admin account Enabling or disabling diagnostic logs Active Roles Log Viewer
SQL Server replication Using regular expressions Administrative Template Communication ports Active Roles and supported Azure environments Integrating Active Roles with other products and services Active Roles Language Pack Active Roles Diagnostic Tools Active Roles Add-on Manager

Adding, modifying, or removing policies

Although the New Policy Object Wizard makes it possible to configure only one policy, a Policy Object may include multiple policies. You can add policies, remove policies, and modify policy options in an existing Policy Object by managing its properties: Right-click the Policy Object and then click Properties.

To add, remove, or edit policies in a Policy Object, go to the Policies tab in the Properties dialog. The tab is shown in the following figure.

Figure 39: Policy Objects Management

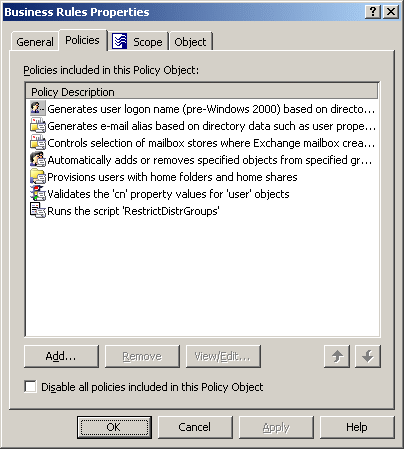
The Policies tab displays a list of policies defined in the Policy Object. Each list entry includes an icon denoting policy type and policy description. The policies are executed in the order shown in the list. To change the order, use the arrows in the lower-right corner of the tab.

On the Policies tab, you can perform the following management tasks:

  • Add policy: Click Add and follow the instructions in the wizard, which depend on whether you are configuring a Provisioning Policy Object or Deprovisioning Policy Object.

    The wizard prompts you to select the type of policy to add and then guides you through the steps to configure the policy. The steps to configure a policy depend on the policy type. For more information on how to configure policies, see Policy configuration tasks.

  • Delete policy: Select policies from the list and click the Remove button. This permanently deletes the policies you have selected.

  • Modify policy: Select a policy from the list and click the View/Edit button. This displays the Properties dialog for the policy you have selected.

    The Properties dialog includes several tabs, with each tab containing the same options as the corresponding page of the wizard used to configure the policy. You can manage policy options the same way as you do when initially configuring the policy.

  • Disable all policies: For troubleshooting purposes, you may need to stop enforcement of the policies without actually deleting them. To accomplish this, select Disable all policies included in this Policy Object.

NOTE: The policies that can be added to a given Policy Object depend on the type of the Policy Object. A Provisioning Policy Object can only include provisioning-related policies whereas a Deprovisioning Policy Object can only include deprovisioning-related policies. For more information, see Provisioning Policy Objects and Deprovisioning Policy Objects.

Steps for adding policies to Policy Objects

To add a policy to a Policy Object

  1. In the console tree, under Configuration > Policies > Administration, locate and select the folder that contains the Policy Object you want to modify.

  2. In the details pane, right-click the Policy Object, and then click Properties.

  3. On the Policies tab, click Add to start a wizard that helps you configure a policy.

  4. On the Welcome page of the wizard, click Next.

  5. On the Policy to Configure page, select the type of the policy you want to add.

  6. Configure policy settings. For instructions, see Policy configuration tasks.

NOTE: Consider the following when adding policies to Policy Objects:

  • The Policies tab lists the policies that are configured in the Policy Object. You can use the Policies tab to add, modify, or delete policies from the Policy Object.

  • Active Roles processes policies in the order they are listed on the Policies tab. To change the order, select a policy and click or to move the policy up or down in the list.

  • Once a Policy Object is applied within Active Roles to determine policy settings in the directory, any changes to the list of policies in the Policy Object causes the policy settings in the directory to change accordingly.

Steps for modifying policies in a Policy Object

To view or modify a policy in a Policy Object

  1. In the Console tree, under Configuration > Policies > Administration, locate and select the folder that contains the Policy Object you want to examine.

  2. In the details pane, right-click the Policy Object, and then click Properties.

  3. On the Policies tab, select the policy you want to view or modify, and click View/Edit.

  4. Use the tabs in the Policy Properties dialog to view or modify policy settings.

    The tabs in the Policy Properties dialog provide the same options as the wizard for configuring the policy. For information about the options specific to each type of policy, see Policy configuration tasks

NOTE: Consider the following when modifying policies in a Policy Object:

  • The Policies tab lists the policies that are configured in the Policy Object. You can use the Policies tab to add, modify, or delete policies from the Policy Object.

  • Active Roles processes policies in the order they are listed on the Policies tab. To change the order, select a policy and click or to move the policy up or down in the list.

Steps for removing policies from Policy Object

To delete a policy from a Policy Object

  1. In the Console tree, under Configuration > Policies > Administration, locate and select the folder that contains the Policy Object you want to modify.

  2. In the details pane, right-click the Policy Object, and then click Properties.

  3. On the Policies tab, select the policy you want to delete, click Remove, and then click Yes to confirm the deletion.

NOTE: Consider the following when removing policies for a Policy Object:

  • The Policies tab lists the policies that are configured in the Policy Object. You can use the Policies tab to add, modify, or delete policies from the Policy Object.

  • Once a Policy Object is applied within Active Roles to determine policy settings in the directory, any changes to the list of policies in the Policy Object causes the policy settings in the directory to change accordingly.

Related Documents

The document was helpful.

Seleziona valutazione

I easily found the information I needed.

Seleziona valutazione